
Showing posts with label sew-good. Show all posts
Showing posts with label sew-good. Show all posts
Thursday, August 16, 2012
How to Keep the Original Hem on Jeans
I've come to realize that I have been hemming jeans the hard and ugly-ish way for a LONG time, until now. Voila! How to Keep the Original Hem on Jeans, here. I tried it today. Easy peasy lemon squeezy.


Wednesday, June 15, 2011


Thursday, May 19, 2011
Embroidery 101
I like the idea of personalizing things with embroidery...especially white pillow cases.
Here's a cute blog with a simple backstitching tutorial...why not? Happy weekend :)


Here's a cute blog with a simple backstitching tutorial...why not? Happy weekend :)
Friday, May 6, 2011
Sunny Side Up Pin Cushion
This Sunny Side Up Pin Cushion is darn cute and could even be easily transformed into bean bags. Imagine a whole assortment of food shaped bean bags? Like a pork chop?! Ha ha ha! What kid/adult doesn't love those bean bag tossing games? And P.S. they'd just look cute in a bowl on the kitchen table or even under the couch when you move it to vacuum.
The tutorial for this super cute pin cushion can be found here.
P.S. Happy Mother's Day to all the moms out there :)

The tutorial for this super cute pin cushion can be found here.
P.S. Happy Mother's Day to all the moms out there :)
Sunday, March 20, 2011
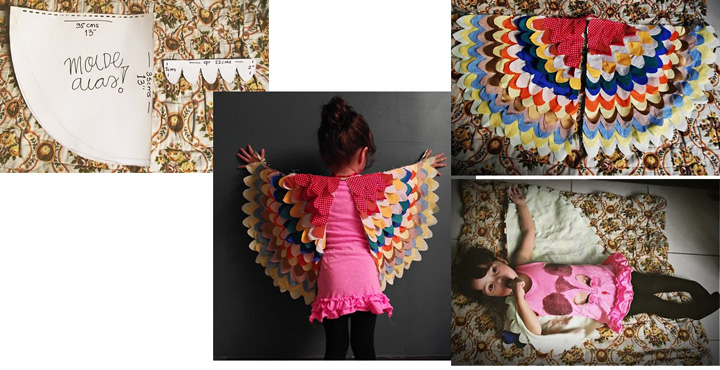
Fabric Angel Wings
I like love-love wings. Check out these darn cute fabric wings from Llevo el invierno By Eri. She's even posted photo instructions and the source of her inspiration - too kind.

Thursday, March 17, 2011
My windows are going to be treated to a whole lotta pretty!
I've tried using flat sheets on the bed before, they're ok but somehow they always seem to be too short. That makes me unhappy and left with a few biggie flat sheets in my linen closet with no hope other than a drop cloth future... UNTIL TODAY (thanks, in part, to Design Sponge, but more so to Yumiko Sekine of Fog Linen Work).
 |
| I just love this... It's more interesting to me than store bough drapery and I can make my biggie sheets into panels for our front window. I'm thinking, same application but on the diagonal. Every night I try to cover the entire spanse with the too short drapes we have hanging right now. Our window needs a duet of draperies... |
Saturday, March 12, 2011
Quilting designed for Moi...
This is the type of quilt I have the patience can handle! The fun, in my mind, would be picking out all the fabric to incorporate and using any leftovers lying around. The fabric is the feature of the design and I like the less traditional stripping incorporated. BUT, I think I'd be tempted to either make the back identical-ish (in fabric, at least) to the front...or monochromatic...WAIT...that could be a whole other quilt!
From here.

From here.

Sunday, March 6, 2011
What to do with that pile of clothes (?!)
If you have some clothes lying around why not repurpose them with a little love and a little thread? Check out these two entire pages (page 1, page 2) from Ruffles and Stuff of revamped little girl clothes, perfect for items that are a little too small or a little bit stained. There are no instruction because everything is sew easy to do (I think you could apply some techniques to an adult wardrobe - with some modifications of course)! P.S. The entire website is super cute. Check it out!
 |
| Onesie to Tee-Shirt |
 |
| Shorts to Skort |
Tuesday, March 1, 2011
How to make a fabric dollhouse
My daughter was gifted a toy like this, it's a birdhouse and there's a hold in the roof to put the birdies in and a see-through plastic side door and window for little hands to take the birdies out. The side also drops down. I think it's the cutest.
I love this barn but think that a 2 dimensional felt scene on the back & side walls (hay bales & a chicken in the rafters, a tractor?) would enhance the play experience. Complete instructions are here.

I love this barn but think that a 2 dimensional felt scene on the back & side walls (hay bales & a chicken in the rafters, a tractor?) would enhance the play experience. Complete instructions are here.

Friday, February 18, 2011
Make your own fabric buckets (!)
I'm always on the lookout for storage solutions. I [love x 2] these fabric buckets because not only can you wash them, but you can make them however big/small your heart desires. Instructions below (from Apartment Therapy) or buy here (I can't find it...but there's a lot of other super cute ideas & products, including online workshops).


What You Need
Materials
Heavyweight fabric (stiff fabric such as duck cloth/canvas)
Coordinating fabric
Coordinating thread
Heavyweight fabric (stiff fabric such as duck cloth/canvas)
Coordinating fabric
Coordinating thread
Instructions
2. Cut out your pieces. For the tall bucket my measurements were 13½" x 24" and a 9" diameter circle. For the smaller bucket my measurements were 10½" x 22" and a 8" diameter circle. Regardless of the size you choose to make, you'll need 2 of each (rectangle and circle), for a total of 4 pieces for each bucket you make.
4. Pin your rectangle pieces together, wrong sides facing in (you should be sewing with the right side facing up).
5. Sew together on three sides, allowing ¼" seam allowance. Leave one of the long sides un-sewn, this will be the top edge.
6. Fold the top raw edge down and under, to form a neat top edge. Press, pin, and then sew your seam with a straight stitch on the top edge as well the bottom edge.
7. Fold the fabric in half so the short sides line up, this will form your tube. The wrong side of the fabric should be facing out. Line up the top edges first, pin, then pin the rest. Sew the two edges together with a straight stitch, but be sure to start with the top edge first so you have a nice even tube.
8. Now for the somewhat tricky part. Take the circle pieces and line them up so the wrong sides are facing together, then match the fabric with the same fabric (my brown fabric will be facing pattern-side out under the natural canvas fabric). Pin fabric by working your way around the circle, making sure you have all 4 pieces included. You might have to gather it to pin in some areas, but mine worked out pretty evenly. If you have too much fabric as you are pinning, just trim the excess, but still keep the shape circular. Sew together where you pinned, again making sure you have sewn through all 4 pieces. I sewed 2-3 times around the circle just to be on the safe side.
9. Trim any excess fabric around the seam on the side of the tube, as well as the circular top. Flip inside out and press your side seam.
10. The finished buckets shown unfolded, but as you can see if the first picture, they work just as well with the top edge folded.
Additional Notes: Measurements for the finished, unfolded buckets are as follows: Large, 8" x 11½". Small, 7" x 9".
Sunday, January 23, 2011
More about freezer paper from Make It and Love It
I've never heard of freezer paper until I came across ways to use it to stencil clothing on Make It and Love It. Haven't been shopping for it yet but am thinking Superstore or Walmart would be on the top of my list as to where to find it, maybe Bulk Barn as well?
Anyways, here's another photo of a freezer stenciled tee. Cute, non? Cheap and Do-able. Right up my alley.

Anyways, here's another photo of a freezer stenciled tee. Cute, non? Cheap and Do-able. Right up my alley.
Monday, November 8, 2010
Make It and Love It - Re-purposing: Stained Tee shirt into a Shrug
This is a cool website that is full of projects to make and love.
Here's a cute post that turns a stained tee shirt into a cute shrug. Maybe I'll make one for myself... If fact, I could probably make about 18! 'Tis the life of a parent :)

Here's a cute post that turns a stained tee shirt into a cute shrug. Maybe I'll make one for myself... If fact, I could probably make about 18! 'Tis the life of a parent :)

Saturday, October 9, 2010
Modifying a pillowcase and white tee shirt
I've seen this on Martha Stewart - but here's a link with instructions on how to turn a pillowcase into a dress for a little girl. The dress can be worn as a billowy shirt when she outgrows it as a dress. I like the idea of jazzing it up with buttons, appliques or other bits.
Jen Leheny's Blog


I saw this on an Esty site (Blues and Branches) and thought it would be a good do-it-yourself project. The product is an iron on applique but it would be easy to use your own fabric if you like to sew. All you need is a grandpa/dad/uncle/godfather with a matching tee & pageboy hat - turned slightly sideways :)
Jen Leheny's Blog


Subscribe to:
Posts (Atom)
